我的学习路径:git basic, http webdav, git-svn, gitosis, gitweb,下面是一些学习记录。
http webdav方式访问
ubuntu下安装非常简单,用apt装上git-core包即可。git仓库的外部访问,首先就是最熟悉的用http协议走apache上的webdav服务,方便啊。git自身的身份认证和权限分配弱了一些,不过可以借助apache实现用户分配,passwd文件直接用[svn的](66)也没问题。apache配置示例如下:
Alias /git "/big2/git"
<Location /git/test.git>
    DAV on
    AuthType Basic
    AuthName "Test git freely"
    AuthUserFile "/big2/svn/svnpasswd"
    #Require user Fwolf
    Require valid-user
</Location>
但这样远不如使用ssh/git协议访问仓库速度快和稳定,但更适合公开/对外发布。另外和svn的webdav方式不同,git webdav是一种dumb transport,不仅慢而且比较傻,只能进行简单的存、取文件操作,所以hooks是不起作用的(很多文章中说的提交后要在hooks/post-update里启用git-update-server-info,指的是git/ssh方式更新后,为webdav对外发布作准备)不会自动进行和git相关的其它处理。
最好用的还是gitosis,后面会提到。有些内容先以webdav方式下来记,使用的时候根据不同的方式转换用户角色即可。
创建服务端的仓库
其实和[svn创建仓库](63)也是比较类似的,找一空目录,比如叫test.git,执行:
$ git --bare init
$ sudo chown www-data:www-data * -R
客户端就可以下载了,但还有些问题:
$ git clone https://domain.tld/git/test.git gittest
Initialized empty Git repository in /home/fwolf/dev/gittest/.git/

error: server certificate verification failed. CAfile: /etc/ssl/certs/ca-certificates.crt
首先遇到的是证书错误,git使用curl,所以证书的处理和svn也不一样,用firefox浏览git网站,在Page Info->View Certificate->Details中把网站的根证书(Issued By/root)导出为一个pem文件,然后将这个pem文件的内容添加到/etc/ssl/certs/ca-certificates.crt的末尾就可以了。接着遇到的是401身份验证错误:
error: The requested URL returned error: 401
git不像svn会自动提示用户名/密码,因为它用的是webdav的原生功能,所以需要在$HOME下创建文件.netrc(记得将权限修改为600):
machine domain.tld
login Fwolf
password your_passwd
最后,还是仓库本身不完善的问题:
warning: remote HEAD refers to nonexistent ref, unable to checkout.
在服务器上仓库目录,执行$ git update-server-info并再次chown到www-data就行了。初次push得指明服务器上的origin对应本地master分支/branch:
$ git push origin master
而下载之前,还要设置下载后放到那个分支、与哪个分支的现有内容进行merge:
$ git config branch.master.remote origin
$ git config branch.master.merge master
$ git pull  # 注意如果服务器是新建的空repo,得随便push点东西才好pull
gitosis
还是通过apt安装,gitosis使用SSH key来认证用户,但用户不需要在主机上开账号,而是公用主机上的一个受限账号。首先创建这个账号(名称可变):
sudo adduser \
    --system \
    --shell /bin/sh \
    --gecos 'git user' \
    --group \
    --disabled-password \
    --home /big2/gitosis \
    git
然后生成自己用户的ssh密钥,可以在git用户的$HOME下操作:
ssh-keygen -t rsa
不要密码,可以起名叫git_rsa[.pub],然后用公钥来初始化gitosis的目录:
$ sudo -H -u git gitosis-init < /home/fwolf/.ssh/git_rsa.pub
Initialized empty Git repository in /big2/gitosis/repositories/gitosis-admin.git/
Reinitialized existing Git repository in /big2/gitosis/repositories/gitosis-admin.git/
可以看出gitosis自己也在用git仓库的形式存储东西,传递公钥进去是为了配置自动登录,将公钥写入git用户的$HOME/.ssh/authorized_keys。接下来就启用gitosis仓库的post-update hook:
$ sudo chmod 755 repositories/gitosis-admin.git/hooks/post-update
其实用apt安装的gitosis,这个post-update早已指向其它文件并具有x属性了。
一点提示:把gitosis的repositories和自己原先的git repo目录弄到一起,以后方便,因为gitosis自己的管理也是要通过git来提交的,在客户端先修改$home/.ssh/config:
Host git.domain.tld
Compression yes
IdentityFile ~/.ssh/git_rsa # 注意这个是私钥,不是pub公钥
然后从客户端clone gitosis的配置文档:
$ git clone git@git.domain.tld:gitosis-admin.git
注意实际上这个gitosis-admin.git应该是在git用户的$HOME下的repositories目录下,但这么写才能下载。clone得到一个配置文件gitosis.conf和目录keydir/,对了,git配置的修改、上传也是通过git提交,并且由于刚才设置的post-update hook,立即生效。所以现在就能够远程修改、提交配置了。下面是一份比较完整的自说明的gitosis.conf:
# example: http://eagain.net/gitweb/?p=gitosis.git;a=blob;f=example.conf
[gitosis]

## Allow gitweb to show all known repositories. If you want gitweb,
## you need either this or a [repo foo] section for each repository
## you want visible in gitweb.
gitweb = no

[group gitosis-admin]
writable = gitosis-admin
# member is key file name, without (.pub)
members = fwolf

# user group
[group all]
# members = jdoe alice bob @anothergroup
members = fwolf
# this user group is writeable to ... repo, eg: test.git.
# writeable = foo bar baz/thud
writeable = test
#readonly = somerepo

[repo test]
## Allow gitweb to show this repository.
gitweb = yes
## Oneline description of the project, mostly for gitweb.
description = Fwolf's test git repository
## Owner of this repository. Used in gitweb list of projects.
owner = Fwolf
## Allow git-daemon to publish this repository.
#daemon = yes
daemon = no
平时就是为其它用户添加SSH key,然后用git@git.domain.tld:repo.git来连接服务器,gitosis会自动比对服务器上的pub key,判断出用户是谁。
gitweb
用apt安装,得到/usr/lib/cgi-bin/gitweb.cgi,由于cgi-bin已经由ubuntu设置好了,apache只要设置一下资源文件路径即可:
Alias /gitweb "/usr/share/gitweb"
然后修改/etc/gitweb.conf:
# path to git projects (<project>.git)
$projectroot = "/big2/git";

$site_name = "Fwolf's Git Repositories";
@git_base_url_list = ("ssh://git\@git.domain.tld");

# directory to use for temp files
$git_temp = "/tmp";

# target of the home link on top of all pages
#$home_link = $my_uri || "/";

# html text to include at home page
$home_text = "indextext.html";

# file with project list; by default, simply scan the projectroot dir.
$projects_list = "/big2/gitosis/gitosis/projects.list";
# Avoid use guess repo's address and edit url manually
$strict_export = 1;

# stylesheet to use
$stylesheet = "/gitweb/gitweb.css";
# logo to use
$logo = "/gitweb/git-logo.png";
# the 'favicon'
$favicon = "/gitweb/git-favicon.png";
重启apache后就能够用http://git.domain.tld/cgi-bin/gitweb.cgi访问了。
git-svn混用
首先还要安装git-svn包,git和svn混用的好处就是既可以用git进行本地提交和灵活的分支,又能够用svn实现集中管理和分发,缺点我想可能就是svn的revision号在git里没有了,另外git有些太灵活,不是很好入门。
首先导入svn的现有项目到一个空目录:
$ git svn clone --username your-name -s https://domain.tld/svn/repo
# older versions of git: replace "-s" with "-Ttrunk -bbranches -ttags"
就这么简单,很多工作git-svn都代劳了,剩下就当正常的git目录使用即可,比如为他们指定git仓库的位置,并下载文件:
$ git config remote.origin.url https://domain.tld/git/test.git
$ git config remote.origin.fetch +refs/heads/*:refs/remotes/origin/*
$ git config branch.master.remote origin
$ git config branch.master.merge refs/heads/master
$ git checkout master   #回到master分支
$ git pull
向svn仓库提交:
$ git svn dcommit
从svn仓库接受更新:
$ git svn rebase
在git-svn的使用中还发现,如果在机器A上使用git-svn,但是在另外一台机器B上用纯git进行了push,那么B上的commit是不会被git-svn认出来并dcommit的,只有pull下来,然后再假commit一下才能让git-svn看到。
仓库地址变更
服务器上直接修改仓库目录名和apache设置,客户端上:
$ git config remote.origin.url https://domain.tld/git/testnew.git
$ git pull  # 这个必须要做,不然不能push
Merge made by recursive.
$ git push
git-svn方式下变更svn的地址
首先要修改所有commit中的地址:
$ git filter-branch --msg-filter 'sed "s/domain_old\/trunk/domain_new\/trunk/g"' $(cat .git/packed-refs | awk '// {print $2}' | grep -v 'pack-refs')
然后删掉缓存,修改地址,重新下载:
$ rm -rf .git/svn
# 编辑`.git/config`修改`[svn-remote "svn"]`的url。
$ git svn rebase (--all)
我还曾经遇到过这样的错误:
$ git svn rebase
Unable to determine upstream SVN information from working tree history
不太好处理,这里有些[参考信息](http://basementcoders.com/?p=63),我是在一个repo里pull另外一个仓库的内容了,照下面方式处理也不管用:
- 从svn里重新clone出一份
- git里创建个branch保存一下
- git连接上服务器,pull
- git checkout 到刚才创建的branch
- git merge –no-ff master
- git svn rebase/dcommit
效果不好,不仅产生大量的conflict,而且还是只能在新创建的branch上rebase/dcommit。大概是出现了两“棵”树,怎么也捏不到一起,最后只好重建仓库。
其它使用技巧/tips
- 回上个版本
$ git reset --hard HEAD^ - 得到一个文件5个版本以前的状态
$ git checkout HEAD~5 foo.c - 由于git是分布式的scm,所以
$Id被彻底消灭掉了。 - 不像svn,git能够记录文件的执行属性。
- 为显示加上颜色
$ git config color.(branch|diff|interactive|status) auto,或者$ git config color.ui true - hooks不算仓库的内容,每个repo的hooks可以不同。
- 当心svn的hooks,如果git里已经commit,却因为svn的hooks使git-svn的dcommit失败,很麻烦。
.gitignore里可以用config.php忽略文件,并且用!mt/config.php指明个别文件还是要归入scm管理的。- 从现有的客户端目录中生成仓库目录
$ git clone --bare dev_dir repo_dir每个客户端都是一个完整备份,方便。 - 用于ignore文件,
.gitignore是要提交的版本,.git/info/exclude则是只在你本地生效的版本,不提交。 - 仅给ssh登录的开发者push/pull的访问权限,将其shell设置为
/usr/bin/git-shell(未测试). info/allowed-users可以控制用户对branch/tag的访问权限(未测试)。git --bare init --shared=group可以让仓库被同group的用户共享,不过有gitosis就不用这个了,我没测试。
参考
- [Howto use Git and svn together(暂时不想向svn提交的用git-stash处理)](http://flavio.castelli.name/howto_use_git_with_svn)
- [git使用总结](http://zhwen.org/?p=articles/git)
- [Develop with Git on a Google Code Project](http://google-opensource.blogspot.com/2008/05/develop-with-git-on-google-code-project.html)
- [git-svn 使用](http://www.dualface.com/blog/?p=591)
- [git使用笔记收藏](http://blog.csdn.net/sunrock/archive/2008/06/05/2514204.aspx)
- [在Dreamhost主机上搭建Git](http://blog.punkid.cn/2008/03/28/howto-setup-git-repo-on-dreamhost/)
- [Setting up a git repository which can be pushed into and pulled from over HTTP(S)](http://www.kernel.org/pub/software/scm/git/docs/howto/setup-git-server-over-http.txt)
- [Tags on Git](http://blog.ashchan.com/archive/2008/06/30/tags-on-git/)
- [架設 Git Server(透過http & 不透過http)](http://www.wretch.cc/blog/michaeloil/22286355)
- [尝试使用git post-receive hook来自动更新blog](http://blog.wangbin1979.com/2009/Mar/07)
- [My HTTP repository has updates, which git clone misses. What happened?](http://git.or.cz/gitwiki/GitFaq#head-bbd07820198a9b8c6ec4fad4932341b64378a5f6)
- [githooks(5) Manual Page ](http://www.kernel.org/pub/software/scm/git/docs/githooks.html)
- [Git Tip: Auto update working tree via post-receive hook](http://debuggable.com/posts/git-tip-auto-update-working-tree-via-post-receive-hook:49551efe-6414-4e86-aec6-544f4834cda3)
- [Hosting Git repositories, The Easy (and Secure) Way(架设gitosis)](http://scie.nti.st/2007/11/14/hosting-git-repositories-the-easy-and-secure-way)
- [Gitosis+GitWeb on Gentoo](http://robbat2.livejournal.com/218418.html)
- [gitweb on ubuntu](http://blog.chunzi.org/2008/11/24/57)
- [如何在svn系统中使用git](http://www.robinlu.com/blog/archives/194)
- [git-svn 常用功能示例](http://s5unty.blogspot.com/2008/03/git-svn.html)
- [git-svn使用方式及使用中的问题(已解决)](http://crazycode.javaeye.com/blog/213212)
- [使用git bisect快速定位引入错误的版本](http://crazycode.javaeye.com/blog/311564)
Update @ 2009-03-27
使用git-svn的时候,有时候会出现git和svn树不太同步的情况,在进行svn rebase的时候总是重新merge文件,这种现象多是由于以前没有正确rebase引起的,而rebase不成功的一种原因就是git的fast forward。简单理解一下,git是按照树形结构排下来的,如果遇到前后两个节点被判定为“重复”的,git就聪明的作了个fast forward,直接使用后者了。这在git里没事,因为都是一颗树,而对于svn就不行了,它还记录着要从前面那个节点开始呢,所以合并的时候就出现了两个源头的情况,自然会产生问题。所以大体上向svn更新的顺序应该是这样的:
- git push # git更新
- git pull –no-ff # 此处的–no-ff最为重要,平时可以不用,这里要用
- git svn rebase # 准备提交到svn之前先和当前的树合并
- git svn dcommit
- git pull –no-ff
- # 后面就是检查了,前面操作正常的话不会产生新的有效更新了
- git push
- git svn dcommit
- git svn rebase
- git pull
- git push
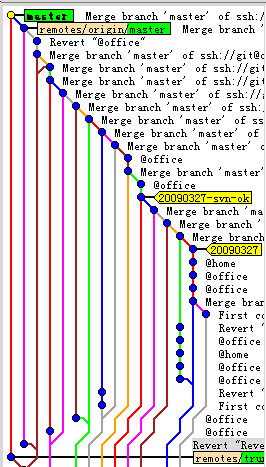
附一张比较典型的出错后来回折腾的结果图:
参考 @ 2009-03-29
- [Git Branch Auto-Tracking](http://graysky.org/2008/12/git-branch-auto-tracking/) 从服务器上pull一个branch以后,方便的track起来
- [Git Auto Completion On OS X](http://blog.ericgoodwin.com/2008/4/10/auto-completion-with-git) 命令自动补全
- [Start a New Branch on your Remote Git Repository](http://www.zorched.net/2008/04/14/start-a-new-branch-on-your-remote-git-repository/)
有了git track以后,新建要和服务器同步的branch:
$ git branch fwolf
Branch fwolf set up to track local branch refs/heads/master.

$ git track fwolf origin
tracking origin/fwolf

$ git checkout fwolf
Switched to branch "fwolf"

$ git push origin fwolf
Total 0 (delta 0), reused 0 (delta 0)
To git@domain.tld:repo.git
 * [new branch]      fwolf -> fwolf
而从其它客户端下载这个branch就简单多了:
$ git branch --track fwolf origin/fwolf
Branch fwolf set up to track remote branch refs/remotes/origin/fwolf.
掌握原理,不用git track也一样可以实现的。
Update @ 2009-04-18
MediaTemple使用的是CentOS,安装git也很简单:
$ rpm -Uvh http://mirror.centos.org/centos/5/os/i386/CentOS/python-iniparse-0.2.3-4.el5.noarch.rpm
$ rpm -Uvh http://mirror.centos.org/centos/5/os/i386/CentOS/yum-3.2.19-18.el5.centos.noarch.rpm http://mirror.centos.org/centos/5/os/i386/CentOS/yum-fastestmirror-1.1.16-13.el5.centos.noarch.rpm  # 版本号可能会有变化
$ rpm -Uvh http://download.fedora.redhat.com/pub/epel/5/i386/epel-release-5-2.noarch.rpm
$ yum -y update
$ yum install git
参考:
- [Installing yum and git on a MediaTemple (dv) 3.5](http://www.theonlyjames.com/2008/08/yum-git-dv-3-5/)
- [装上个git](http://uptolife.blogspot.com/2009/03/git.html)
- [在CentOS上安装Git](http://gonefish.cn/weblog/easy-install-git-in-centos/)
- [Installing Git binaries onto a MediaTemple server](http://www.themattharris.com/2008/08/06/installing-git-binaries-onto-a-mediatemple-server/)
Update @ 2009-04-27
升级到ubuntu 9.04 jaunty后,客户端push时会遇到错误:
$ git push
/usr/bin/gitosis-serve:5: UserWarning: Unbuilt egg for ClientCookie [unknown version] (/usr/lib/python2.6/dist-packages)
  from pkg_resources import load_entry_point
Traceback (most recent call last):
  File "/usr/bin/gitosis-serve", line 5, in <module>
    from pkg_resources import load_entry_point
  File "/usr/lib/python2.6/dist-packages/pkg_resources.py", line 2562, in <module>
    working_set.require(__requires__)
  File "/usr/lib/python2.6/dist-packages/pkg_resources.py", line 626, in require
    needed = self.resolve(parse_requirements(requirements))
  File "/usr/lib/python2.6/dist-packages/pkg_resources.py", line 524, in resolve
    raise DistributionNotFound(req)  # XXX put more info here
pkg_resources.DistributionNotFound: gitosis==0.2
fatal: The remote end hung up unexpectedly
半天查不出原因,只是怀疑和python的版本有关系(2.5/2.6),因为[gitosis在debian包中的文件](http://packages.debian.org/lenny/all/gitosis/filelist),显示应该是对应python 2.5的,不过,试着自己用python(2.6)重新下载安装了一遍gitosis,好了:
$ git clone git://eagain.net/gitosis $ cd gitosis $ sudo python setup.py install |
不懂Python太吃亏了呀。另外aptitude reinstall gitosis是没用的。
Update @ 2009-05-15
从[Tsung](http://plog.longwin.com.tw/)那里学来[一招](http://plog.longwin.com.tw/my_note-unix/2009/05/15/git-initial-env-setup-2009),可以更改 Git 默认的信息存放目录 .git :
修改 Shell 變數 GIT_DIR => "export GIT_DIR=.test"
Update @ 2010-08-03
升级到 Ubuntu 10.04 Lucid 以后,gitosis 自带的 hook 文件 post-update,就是修改权限等等 commit 后,自动出发 gitosis 更新相关配置的钩子,原来 ln 到的 /usr/share/python-support/gitosis/gitosis-0.2-py2.5.egg/gitosis/templates/admin/hooks/post-update 无效了,更换成 /usr/share/pyshared/gitosis/templates/admin/hooks/post-update 就可以了,参见[Bug报告](https://bugs.launchpad.net/ubuntu/+source/gitosis/+bug/536775)。挺让人无语的bug,我折腾了半天还以为是权限设置出了什么问题呢。
怎么都转到git上去了啊,svn不够用吗?有啥好处
乍一下就想到这么多吧,分布式scm还是有很多优点的。
最近一个朋友也推荐我使用git,踩一下以备后用。
你写的这些东西非常好,我刚开始使用git,看了git-svn心里就更加坚定了。他们用svn,我照样使用git,branch太方便了。
你还有个博客呢,不早说,省了到处找资料了